
5 days, One GPU Gameboy Swarm

These words are my own, no LLM is used to corrupt my voice.
I built a fully functional "Pokemon-Red"-playing Gameboy emulator swarm.
Running on a GPU.
And it is fast.
I'm not an expert emulator developer. This is my 4th Gameboy emulator attempt, and only my first success. And it took just 5 days. To build a fully correct and fast CUDA emulator. I didn't write the CUDA kernels by hand of course, it was smelted in my cybernetic forge (which I'll explain later, I promise).
In this post I will:
- Tell you more about why I got started in the first place with this project.
- What do I mean by cybernetic forge, and how I applied this approach towards the emulator development, with the aim you'll be able to learn something to apply to your own projects.
- More detailed results of the emulator swarm in case you want to use this project yourself.
- Why I'm putting aside my machine learning aims, and doubling down on the forge, and what to expect more from me + how we can exchange ideas.
Why
I followed my curiosity to explore machine learning and built a reinforcement learning (RL) system with an AlphaZero implementation of Azul that you can try on your phone.
I picked up a NVIDIA DGX Spark to keep myself serious. I came across the Arcade Learning Environment (ALE) and seeing an emulator reminded me of my never-ending Gameboy emulator quest:
In 2019/2020, I spent months on a WASM emulator and made a little video series along the way and reached buggy Tetris status. I attempted a hardcaml implementation for a few weeks last summer but didn't get very far, and my SIMD WASM emulator attempt from the Fall could play a buggy Tetris in parallel after a couple weeks of focus.
When I read more about the Arcade Learning Environment, I was curious if anyone had tried actually putting the emulator on the GPU and came across CuLE: GPU-Accelerated Atari Emulation for Reinforcement Learning (Dalton et al, NVLabs). Researchers at NVIDIA found that you could get speedups by moving emulation to the GPU despite gnarly control flow. Modern GPUs schedule workflows starting from similar game states very efficiently. And you avoid CPU<->GPU communication when using emulator state for ML training.
Interesting! I became excited to reproduce this CuLE work for Gameboy. Because then I'd be able to experiment with Pokemon RL just like Peter Whidden did in his viral video and the Pokemon RL Experiment did.
Cybernetic Forge
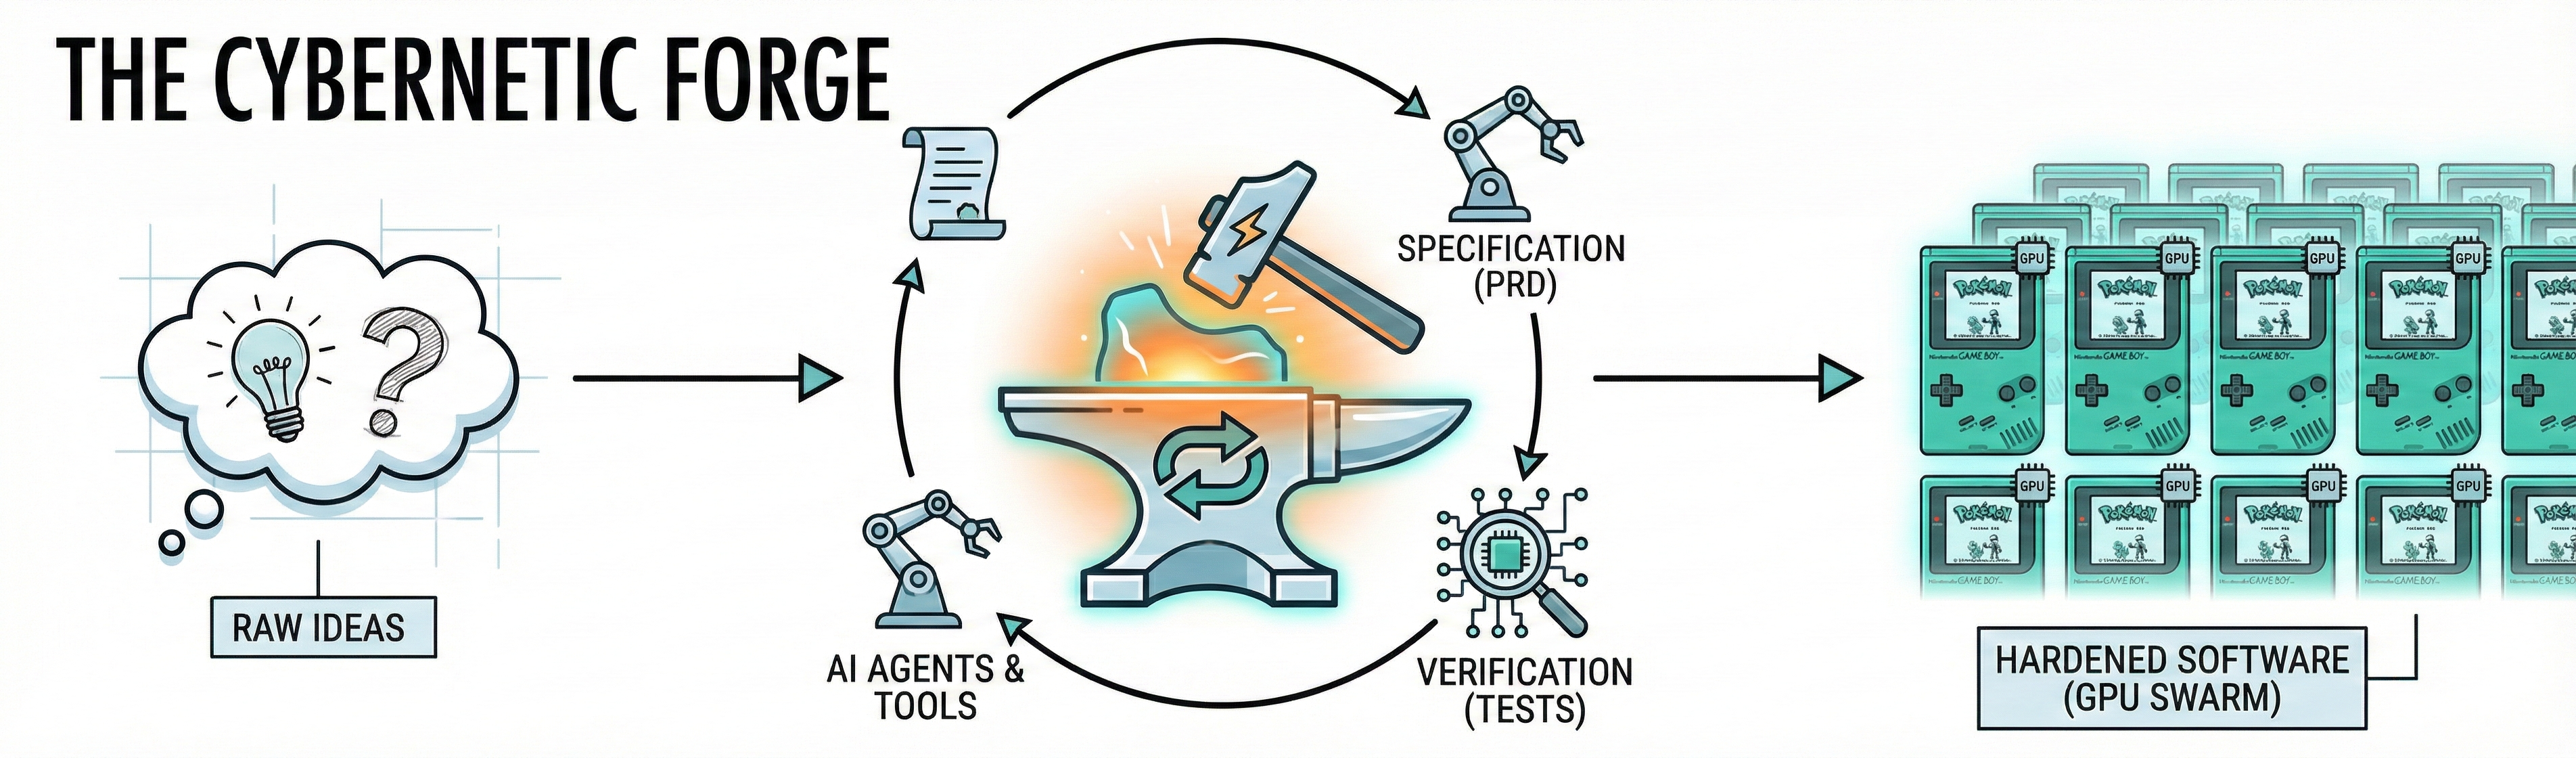
I'm early in my journey in formalizing and reifying my flavor of modern agentic engineering into what I'm calling my Cybernetic Forge.
- Cybernetics is the study of recursive feedback loops impacting intelligent systems
- A forge is a place where metal is heated and shaped by a smith, creating something out of raw materials
You can think of the Cybernetic Forge as wiring together a series of AI tools and agents, in a particular way, that enables us to hammer raw ideas into hardened software at superhuman speed.
Ultimately, it boils down to careful specification, clear automated verification, and deterministic feedback loops so that agents can figure out problems for themselves.
Let me show you how these pieces fit together by walking you through how I built this emulator.
Building this emulator
1. Ideating, exploring, and a (failed) prototype
In this step, I shape an internal understanding to prepare myself for being clear and precise about what I want to build.
Initially, I shape this idea through conversations with various LLMs: Gemini and ChatGPT in this case. Here I discover the CuLE paper, and talked it through with the LLMs. Initially, I land on combining Madrona Engine, a research game engine designed specifically for creating learning environments that execute with on GPUs, and Sameboy, a C++ Gameboy emulator, which we could port to Madrona.
In order to know if this would work, I first build out some hacky infrastructure that measures a baseline using drubinstein's existing pokemon RL work. I'm not going to go into too much detail on this part since I would end up repeating myself in the next section, but briefly: Through back-and-forth with Gemini and ChatGPT, I build a small PRD to setup this harness. And working with LLMs, small experiments quickly invalidate the Madrona Sameboy approach due to big performance issues relative to the baseline, so I go back to the drawing board (ideating more with Gemini and ChatGPT).
Eventually, I land on an approach of using NVIDIA Warp, a Python framework for writing high-performance simulation and graphics code which works by taking "regular"-ish Python functions and JIT compiling them to efficient CUDA kernel code. And rather than porting existing emulator code, I can try writing it from scratch.
2. Design and Architecture
In this step, the goal is to end with:
- A product requirements doc or PRD which specifies the project, in this case scoped to creating benchmarks, harness, and the full implementation of emulator swarm. And with milestones as well.
- A more refined document for the each milestone (starting with one) and broken down with epics and stories, like a typical product manager would
- An engineering architecture document based on the PRD for each milestone as needed
After settling on the idea, I start a more careful conversation with both Gemini and ChatGPT Pro building up more and more details. [I've shared one of my ChatGPT Pro conversations at this step so you can see exactly what this looks like if you're curious.]
First, I feed in my experiment with Madrona as part of the initial input; this contains a harness with a reference PyBoy Gameboy emulator.
Since ChatGPT Pro is slow, I have faster conversations with Gemini Pro in the downtime and feed in those results during the ChatGPT Pro conversation.
Note that I ask the LLM to ask me clarification questions as part of the process before being satisfied with a PRD for a complex project like this, here's a few of those questions along with suggested answers from ChatGPT:
6. How will we balance correctness vs performance when they conflict? Architect answer: Correctness-first on the micro-ROM suite; performance tuning begins once CPU-only correctness is stable. Performance work cannot break verified signatures.7. What timing fidelity do we need: instruction-accurate, cycle-accurate, or "good enough" for RL? Architect answer: Start with instruction-accurate for micro-ROM correctness; evolve toward enough cycle correctness for stable gameplay later. RL doesn't require perfect cycle fidelity, but some games do.8. What artifacts must be stored/versioned? Architect answer: ROM suite metadata, golden signatures, golden traces (compressed), benchmark JSON outputs, ABI schema versions.
Ultimately, through further back-and-forth, we end up with artifacts:
- A PRD with milestones
- Milestone 0 further refined and in more detail
- Epics and stories for the work. In this case, I even make docs for each of the epics with ChatGPT.
Here are a few snippets from the PRD so you can get a feel for what this kind of document might look like.
# PRD Draft: GBxCuLE Learning LabGPU-Native Many-Env Game Boy Runtime (Warp->CUDA) + Benchmark/Verification Harness## 2) Hypothesis (project thesis)> **Hypothesis H:** A GPU-native multi-environment Game Boy runtime can achieve **meaningful steady-state throughput speedups** relative to CPU multiprocessing baselines (PyBoy + vectorized/multiprocess stepping) on a **moderately powerful NVIDIA GPU (DGX Spark class)** for emulator stepping workloads representative of RL training loops.This PRD requires early experiments intended to **verify or falsify** H before substantial investment in game-specific complexity.## 7) System overview### Components1. **Backends (swappable via harness)**- `pyboy_single`: simplest "trusted reference" runner for micro-ROMs and sanity baselines.- `pyboy_vec_mp`: CPU multiprocessing baseline (puffer/mp style) where applicable.- `warp_vec`: DUT backend supporting: - Warp CPU device (debug) - Warp CUDA device (performance)1. **Harness (`bench/harness.py`)**- single CLI entrypoint for: - correctness verify (ref vs dut) - benchmarks (single, scaling, steady-state) - experiment ladder E0-E41. **Micro-ROM suite**- generated locally (license-safe)- used to validate CPU correctness and stress divergence/memory early## 11) Benchmarking requirements### 11.1 Metrics (REQUIRED)- total steps/sec (SPS) across all envs- per-env SPS- scaling efficiency vs linear- effective FPS (if step maps to a fixed tick count)- steady-state vs warm-start throughput## 12) Hypothesis experiment ladder (REQUIRED; E0-E4)To rapidly verify/falsify Hypothesis H, the harness must support a standardized experiment ladder:### E0: launch/plumbing ceilingWarp kernel that does trivial per-env work (e.g., increment counter).Goal: measure overhead scaling and establish ceiling.### E1: ALU_LOOP micro-ROMDeterministic tight loop with a small instruction mix.### E2: divergence stress micro-ROMBranching workload that causes env divergence.### E3: memory stress micro-ROMLoad/store heavy workload stressing access patterns.### E4: minimal reward on deviceCompute a small fixed feature vector and reward on GPU without per-step host copies.
You can see the initial full PRD checked into the repo.
I don't derive an engineering architecture document at all layers, but you'll see in this chat I do for Epic2 of the first milestone.
In a separate chat shared here in full seeded with the PRD, I create my top-level engineering architecture document.
I also want to emphasize the importance of strong automated verification criteria in these documents. I'll show you how this project leverages that verification criteria later. Here you'll notice in the artifacts there are references to:
- Typechecking
- Linting and formatting
- Unit tests
- Micro-rom test suites
- Smoke tests
- Reference implementation vs device under test
3. Plan Refinement
In this step, I take these higher level documents, create even more specific documents, and carefully break each task into machine-readable tasks called beads (beads_rust).
Firstly, I copy over all the markdown generated during the initial design and architecture work into the git repo for the project. I use Steve Yegge's structure of a history/ folder for these documents as they reflect a single point in time and are not living docs (which instead may go in docs/). You can see all these history markdown files in the repo.
Depending on the complexity of each step, I break it down into one or more workstream documents. I use codex GPT-5.2 xhigh to break down and refine plans. At this point, I tell codex to read not only the relevant markdown plans from web ChatGPT, but also the codebase to make sure it's relevant for our actual implementation. For example, this is a plan for implementing the CPU ISA of the Gameboy informed by the existing state of the codebase.
Once I have a refined plan, I break it down into beads. Beads are local-first issues, forming a kind-of agent-native Jira. Claude code's new task system is inspired by beads. I ask Codex or Claude to make beads that each include a reference to the relevant markdown files, and acceptance criteria or a test plan so the agent will get the right context and be able to check its work. This is important for the effectiveness of our feedback loop.
Here's a snippet from one of the beads, bd-2l51, from this project:
Goal:- Implement scanline-accurate PPU timing inside CPU step kernel (Milestone D D0/D2).Spec to implement (from `history/gameboy-milestone-d-plan.md`):- Track per-env scanline_cycle and ly (no dot timing).- When LCD is off (LCDC bit 7 = 0): - force scanline_cycle=0, ly=0 - write LY=0 - update STAT with coarse mode=0 + coincidence - no VBlank request- When LCD is on: - advance scanline_cycle by instruction cycles - on scanline boundary: ly++ (wrap 153->0) - when ly transitions 143->144: set IF bit0 (VBlank) - update LY and STAT at each boundary- STAT mode bits: coarse model (VBlank vs non-VBlank), no mode 2/3/0 timing.- Coincidence: STAT bit2 is set if LY==LYC; update at boundary (and optionally on LYC writes).Latch capture (env0 only):- At scanline start (LY becomes y), capture: - LCDC, SCX, SCY, BGP into bg_*_latch_env0[y]- On LCD enable (LCDC 0->1), treat as scanline 0 start and capture latches for y=0.Implementation details:- Add ppu_scanline_cycle/ppu_ly buffers to CPU kernel signature (warp kernel args).- In `cpu_step_builder.py`: - integrate scanline-advance logic right after instruction cycles are known (after timer_tick and before interrupt service is fine, as long as IF changes are visible before next instruction). - update LY/STAT/IF using write8 or direct mem writes (preserve IF other bits).- Ensure HALT path also advances scanline timing because cycles still elapse.Touch points:- `src/gbxcule/kernels/cpu_step_builder.py`- `src/gbxcule/kernels/cpu_step.py` (kernel signature additions)- `src/gbxcule/backends/warp_vec.py` (pass new buffers)Tests:- Add/extend `tests/test_ppu_timing.py` to assert: - LY wraps 0..153 after CYCLES_PER_FRAME - exactly one IF.VBlank per frame - STAT mode bit = 1 for VBlank lines, 0 otherwiseAcceptance:- Scanline timing deterministic, no dot-level timing.- VBlank IF is requested at LY=144 entry.- Latches captured for env0 at scanline start.Dependencies:-> bd-3h8s (blocks) - D1: ABI v4 PPU scanline buffers + latchesDependents:<- bd-275o (blocks) - D3: PPU renderer kernel (BG, scanline latches)
4. Implementation
This is actually the easy part because I just tell the agents to implement each bead! But be careful!
You can't trust non-deterministic behavior from models; eg. to always run tests even if it's in the AGENTS.md / CLAUDE.md .
So I make a pre-commit hook which runs make check. In this project, make check typechecks, format-checks, lints, builds roms, builds the code, and runs (CPU) tests. If you look carefully in the plans, I make sure that I simultaneous define CPU and GPU code as much as possible so I can have the test suite just run on the CPU.
Then I ask Codex to implement the beads, one at a time, and commit each time. In a more simple project, I may even Ralph loop over the beads, though for this emulator project, I check the work after each step; not scrutinizing over every line of code mind you, but at least skimming.
5. Repeat until done
Then I just repeat the process. New PRDs, architecture docs, refined plans, beads, and implementations until the code works.
Occasionally, the test suite grows too hairy and I need to take some time with Claude Code to remove redundant or bad tests, speed up slow ones, and parallelize the suite.
I start using a CONSTITUION.md during planning which I now reference as early as the PRD stage for new projects.
The only opinionated piece of code I push the LLMs toward is the templating system which enables building small pieces of GPU logic in separate functions and even this I specified using this same workflow. This is needed because each Warp kernels maps one-to-one to a GPU kernel and the gameboy emulation runs as a mega-kernel. You can read more about this in the README.md
The models are getting smarter: Codex one-shots test Gameboy ROMs in hex by itself. This allows the model to find its own bugs by running carefully crafted test roms on the reference emulator and this one (the device under test or DUT).
I cannot believe within only 5 days, I went from zero to Pokemon on a GPU.
Results
Timeline
| Day | Date | Milestone |
|---|---|---|
| 1 | Jan 21 | Zero -> harness + reference impl + verify mode + emulator skeleton |
| 2 | Jan 22 | CUDA backend, action codec, joypad, Puffer RL framework |
| 3 | Jan 23 | Full CPU instruction set (all opcodes + CB prefix) |
| 4 | Jan 24 | Interrupts, PPU (BG/window/sprites), MBC, Tetris renders |
| 5 | Jan 25 | Tetris stable, Pokemon Red boots, first RL training |
Look through my unmodified git commit history on GitHub to reproduce the timeline yourself.
Performance
On my Nvidia DGX Spark [20-core ARM, GB10 GPU], this benchmark initializes from a Tetris savestate and does this loop:
- Advances 24 frames per step (frame skip = 24)
- Extracts the observation tensor
- Samples a button-press action (random policy)
- Applies the action No cheating: The GPU executes divergent instruction streams across warp lanes via distinct joypad inputs.
- Baseline Pyboy+Pufferlib: 5,366 SPS @ 64 envs [5,355 SPS @ 128 envs]
- CUDA Warp Backend: 17,200 SPS @ 16,384 envs [16,272 SPS @ 8192 envs]
What about the RL part?
I implemented a few RL "algos": A2C, Async PPO, even Dreamer v3, before realizing that Dreamer was inefficient for this shaped problem.
I tried some reward shaping and kept hitting walls, and I realized I'm not passionate about this part of the system. A wave of demotivation washed over me at this point.
But upon reflection, I think the harness is still really interesting both as a case-study for this cybernetic forge and as something others may find useful to build upon. I've pushed all my experiments, so maybe this is a good starting point for those who are excited about it!
Highest Agency
People keep saying "You can just do things". We are past that. Now it's "You can just do ridiculously difficult things ridiculously quickly". And this was even true in the codex-5.2/opus-4.5 era. You just need to start iterating on your cybernetic forge :)
I've been shaping versions of the cybernetic forge with iOS apps, Web apps, backend projects, theorem proving, and random hard stuff like this CUDA Gameboy emulator. I want to experiment more outside of software too. I intend on sharing more as I do more. And I'd love to talk to you about it.
Even though I abandoned the project before I got any interesting RL results, the fast emulator swarm may be useful to folks. If you do anything interesting with it, reach out and let me know on X @bkase_!
Thanks @christinetyip for giving me feedback on an early draft of this post.